Garage door sensors — also called photo eyes or safety sensors — are the small devices mounted about six inches off the ground on each side of your garage door opening. They project an invisible infrared beam across the doorway, and if anything breaks that beam, your opener refuses to close the door. It’s a federally mandated safety feature (UL-325) on every automatic opener sold in North America since 1993.
When those sensors fall out of alignment, your door stops closing. This guide walks through exactly how to realign them on Chamberlain, LiftMaster, and Craftsman garage door openers — the three most common brands in North American homes, all manufactured by the same company, all using the same alignment process.
Most homeowners can complete the alignment in under five minutes with nothing more than a screwdriver and a soft cloth.
Quick Summary
Loosen the mounting bracket on the sensor whose LED is off or blinking. Tilt the sensor slowly until the light turns solid (green on the sending sensor, amber or yellow on the receiving sensor). Tighten the bracket. Test the door. That’s it.
1 How Garage Door Sensors Work
Every residential garage door opener uses a pair of photoelectric sensors working together:
- The sending sensor (usually on the left, marked with a green LED) emits a continuous infrared beam across the door opening.
- The receiving sensor (usually on the right, marked with an amber or yellow LED) detects that beam.
As long as the receiving sensor sees a steady beam, the opener allows the door to close. The moment anything breaks that beam — a pet walking through, a broom leaning against the wall, or the sensors themselves drifting out of alignment — the opener halts the close command and, if the door is already moving, reverses it back to the open position.
This system operates on low-voltage DC current, typically drawing less than one watt of power. The sensors communicate with the opener’s logic board through two thin wires (usually white and black) that run up the door track to the motor unit.
Why Sensors Drift Out of Alignment
Even in a well-maintained garage, sensors gradually move out of position due to:
- Accidental contact — a car bumper, a stored bicycle, lawn equipment, or moving items in and out of the garage
- Vibration — every door cycle produces micro-vibrations that slowly loosen the mounting brackets
- Thermal expansion — seasonal temperature swings cause the metal brackets and tracks to expand and contract
- Wire strain — if the sensor wire gets snagged or pulled, it can tilt the sensor slightly
- Settling — older garages shift slightly over time, which can throw off the alignment of sensors mounted on opposing tracks
Even a one-degree shift across a 16-foot opening is enough to break the beam and prevent your door from closing.
2 Signs Your Sensors Need Alignment
Before starting the alignment process, confirm that sensors are actually the problem. Look for these symptoms:
| Symptom | Likely Cause |
| The door opens normally, but refuses to close | Misaligned or blocked sensor |
| The door starts closing, then reverses unexpectedly | Beam broken partway through the close cycle |
| Opener courtesy light flashes 10 times | Opener courtesy light flashes 10 times |
| One sensor LED is off, dim, or blinking | That sensor cannot see its partner |
| The door only closes when holding the wall button | Opener in manual override, bypassing sensors |
| Wall panel shows Error 4-6, 1-4, 1-1, or 1-2 | Sensor obstruction, misalignment, or wiring issue |
If any of these match what your door is doing, sensor alignment is the first thing to check.
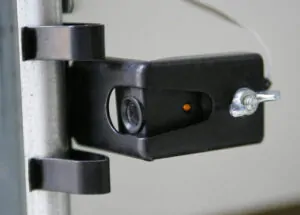
3 Reading the Indicator Lights
The small LED on each sensor is the fastest diagnostic tool you have. Before touching anything, walk over and look:
- Both lights are solid and steady — sensors are aligned. If the door still won’t close, the problem is elsewhere (remote, wall lock, travel limits, logic board).
- Green LED solid, amber LED off or blinking — the sending sensor is firing correctly, but the receiver can’t see the beam. Focus alignment on the amber-lit sensor.
- Green LED off — the sending sensor has lost power. Check the wiring, terminal connections at the opener, and the sensor itself.
- Both LEDs off — likely a wiring problem, blown fuse, or the opener has been unplugged.
This simple visual check tells you within seconds which sensor needs attention and what to check next.
4 What You’ll Need
Sensor alignment requires almost nothing in the way of tools:
- A Phillips or flathead screwdriver (depending on your bracket type)
- A soft, dry cloth — microfiber is ideal
- A small bubble level (optional but useful for precision)
- A piece of string about 16 feet long (optional — see the string method below)
- A step stool is not required; sensors are mounted low
Do not use glass cleaner, water, or solvents on the sensor lenses. A dry cloth is sufficient and won’t allow moisture to seep into the sensor housing.
5 Step-by-Step Alignment Instructions
Step 1: Disconnect Power (Optional but Recommended)
For safety, unplug the garage door opener from its ceiling outlet, or flip the breaker controlling the garage circuit. The sensors operate on low voltage and the risk of shock is minimal, but cutting power eliminates any chance of the door moving while you’re working on it.
Step 2: Clear the Sensor Path
Move any storage items, trash cans, bikes, tools, or equipment away from both sensors. Anything within 12 inches of the beam path can cause false readings. Also, sweep away any cobwebs — spider webs are surprisingly effective at blocking infrared light.
Step 3: Clean the Lenses
Look closely at the small, clear lens on the front of each sensor. Dust, condensation, and road salt accumulate on these lenses over time. Wipe each one gently with a dry microfiber cloth. Do not apply pressure — the lenses scratch easily, and scratches permanently reduce sensitivity.
Step 4: Identify the Misaligned Sensor
Restore power if you disconnected it in Step 1, then look at the two LEDs. The sensor whose light is off, dim, or blinking is the one that needs alignment. If both are blinking, start with the receiver (amber/yellow LED).
Step 5: Loosen the Mounting Bracket
Each sensor is attached to the door track by a bracket held in place with a wing nut (on most LiftMaster and Chamberlain models) or a Phillips screw (on older and some Craftsman models). Loosen the fastener just enough that you can tilt the sensor — do not remove it completely. If the sensor falls, you’ll have to re-feed the wire through the bracket.
Step 6: Gently Tilt the Sensor Toward Its Partner
Slowly pivot the loose sensor up, down, left, or right while watching its LED. As you move it, the light will progress from off → blinking → steady. Stop the moment the LED becomes solid. That is the correct alignment position.
If you overshoot, the light will start blinking again. Back up until you find the sweet spot. Hold the sensor motionless once the light is steady.
Step 7: Tighten the Bracket
While holding the sensor in the aligned position with one hand, tighten the wing nut or screw with the other. Do not overtighten — you risk cracking the plastic housing or stripping the bracket. The fastener only needs to be snug enough to prevent the sensor from shifting.
Check the LED one more time. If it’s still solid, you’re aligned.
Step 8: Test the Door
Press the remote or wall button and watch the door close. It should travel all the way to the floor without stopping or reversing. If it closes successfully, you’ve fixed the alignment.
Step 9: Perform the Safety Reversal Test
Once the door is closing normally, confirm the sensors are actually working by performing this test:
- Open the door fully
- Place a 2×4 flat on the floor directly in the door’s closing path, centred in the opening
- Press the remote to close the door
The moment the door touches the wood, it should immediately reverse and return to the fully open position. If it does, your safety system is functioning correctly. If the door closes on the 2×4 or continues pressing against it, there’s a deeper problem with your opener’s logic board or force settings — and you should stop using the door until it’s professionally serviced.

6 Using the String Method for Perfect Alignment
If you’re having difficulty getting the LED to turn steady using visual alignment alone, professional garage door technicians often use a simple string trick:
- Slide both sensors to their lowest position on the mounting brackets
- Tie a piece of string around the base of one sensor
- Stretch the string across the opening and tie it to the base of the other sensor, pulling it taut
- Place a small bubble level on top of or against the string to check that it runs perfectly horizontal
- Adjust one or both sensors (by sliding the brackets up or down) until the string is level
- Tighten the brackets once the string is level
This guarantees that both sensors are at exactly the same height and pointing directly at each other. It’s particularly useful if the garage floor is uneven or if the door tracks have shifted over time.
7 Decoding Chamberlain and LiftMaster Error Codes
Modern Chamberlain and LiftMaster openers use a two-digit diagnostic code system. If your opener has a digital wall panel (Security+ 2.0, MyQ Smart, or similar), the code will display on the screen. If you have a standard motor unit, the UP and DOWN arrow lights near the yellow Learn button will flash the code in sequence — count the UP flashes first, then the DOWN flashes.
Here are the Chamberlain garage door opener error codes and Liftmaster garage door opener troubleshooting directly related to sensors:
| Error Code | What It Means | Fix |
| 4-6 | Sensors blocked or not aligned when closing (most common) | Clean lenses, realign sensors |
| 1-4 | Intermittent sensor obstruction or wobble | Tighten the bracket, check for sunlight |
| 1-1 | Sensors disconnected or can’t communicate | Check terminals, wires, staples |
| 1-2 | Sensor wire polarity reversed | Match white-to-white, black-to-black |
| Light blinks 10x | Same as 4-6 on units without a wall panel | Clean lenses, realign sensors |
| Important: All of these sensor-related codes are resolved using the same alignment and cleaning procedure. You don’t need separate fixes for each code. |
8 Brand-Specific Notes: Chamberlain, LiftMaster, and Craftsman
One of the most common questions homeowners ask is whether the alignment process differs between brands. The short answer is no — because all three are the same product underneath.
Chamberlain Group manufactures all three brands:
- LiftMaster is the professional-installer line, sold through authorized dealers
- Chamberlain is the consumer retail line, sold at home improvement stores
- Craftsman garage door openers (sold by Sears historically) are Chamberlain units rebranded for the Craftsman label
This means the sensors, wiring, indicator lights, error codes, and alignment procedure are functionally identical across all three brands. If your opener is any of these three, everything in this guide applies directly.
A few minor differences worth noting:
- Older Craftsman units (pre-2000) may have slightly different bracket styles, but the alignment principle is identical
- Newer LiftMaster Security+ 2.0 models show diagnostic codes on a backlit wall panel rather than using flash sequences
- MyQ-enabled models will send you a mobile notification when sensors report an error — check the MyQ app for diagnostic messages
Genie, Overhead Door, and other brand openers use a slightly different sensor design but the underlying concept — two photo eyes, one beam, alignment matters — is the same. The visual LED diagnostic method still applies.
9 Troubleshooting When Alignment Doesn’t Fix It
If both LEDs are solid but the door still won’t close, or if one LED refuses to illuminate no matter how you position the sensor, the root cause is likely deeper than alignment. Work through these possibilities in order:
Damaged or Disconnected Wiring
Follow the sensor wires from each sensor up to the opener motor unit. Look for:
- Staples that pierced through the insulation
- Visible chew marks (rodents in the garage are a common culprit)
- Loose or pulled-out terminal connections at the motor
- Pinched wires where the sensor bracket meets the track
- Wires that have been accidentally cut or abraded against metal edges
Repair any damage using 22-gauge low-voltage wire, matched white-to-white and black-to-black. Wire nuts or push-in connectors work; avoid electrical tape, which loosens over time.
Direct Sunlight on the Receiver
If your garage faces west (or east, depending on when the problem occurs), direct sunlight streaming into the receiving sensor can overwhelm the infrared beam. The receiver simply can’t distinguish the sensor’s beam from the ambient sunlight.
To diagnose this, temporarily tape a piece of cardboard above the receiver to shade the lens. If the door starts closing reliably, sunlight is your problem. The permanent fix is either a small sun shade clipped to the sensor bracket, repositioning the sensor slightly, or adding sensor shield accessories sold by Chamberlain and LiftMaster.
Failed Sensor
Photo eye sensors typically last 10 to 15 years. After that, the internal LED or photodiode can fail, and no amount of alignment will bring the unit back. Signs of a failed sensor include:
- One LED that refuses to illuminate even when the sensor is disconnected from the bracket and pointed directly at its partner at close range
- Visible moisture damage inside the sensor housing
- A sensor that used to work intermittently and has now stopped entirely
Replacement sensor kits for Chamberlain, LiftMaster, and Craftsman openers are cross-compatible and cost $30 to $50. They take about 15 minutes to swap out. Make sure to match the sensor’s model number or look for a kit explicitly compatible with your opener.
Failed Opener Logic Board
Rare, but possible. If you’ve replaced the sensors, verified all wiring, and the opener still won’t accept the safety signal, the logic board inside the motor unit may have failed. This requires professional diagnosis — logic boards are model-specific and can cost $100–$200 plus labor.
| Never Bypass the Sensors Permanently. You can temporarily close the door by pressing and holding the wall-mounted button until the door is fully closed. This is acceptable as a short-term workaround while you diagnose or schedule repair. Permanently disabling the safety sensors violates UL-325 safety standards and removes the one feature preventing your door from closing on a person, pet, or vehicle. Garage doors weigh several hundred pounds and close with significant force. The sensors exist for a reason. |
10 How Often to Check Sensor Alignment
A 30-second check once a month prevents most sensor problems from ever reaching the point of a service call:
- Glance at both LEDs — both should be solid
- Wipe the lenses with a dry cloth
- Make sure nothing is stored within 12 inches of either sensor
- After any garage cleaning, reorganization, or accidental bump from a vehicle or equipment, re-check alignment immediately
Routine sensor maintenance also extends the lifespan of your opener. A door that repeatedly tries to close but fails due to sensor misalignment puts unnecessary strain on the motor, trolley, and logic board.
11 Frequently Asked Questions
Why is my garage door opening but not closing?
The most common reason a garage door opens but won’t close is misaligned or dirty safety sensors at the bottom of the door tracks. The opener detects a broken infrared beam and refuses to close for safety reasons. Cleaning the sensor lenses and aligning both sensors until their LEDs glow steady typically resolves the issue in under five minutes.
How do I know if my garage door sensors are aligned?
Both sensors have LED indicator lights. When properly aligned, one LED glows solid green (the sending sensor) and the other glows solid amber or yellow (the receiving sensor). If either light is off, dim, or blinking, the sensors are misaligned or obstructed.
What does Error Code 4-6 mean on my Chamberlain or LiftMaster opener?
Error Code 4-6 indicates that the opener detected the safety sensors were blocked or out of alignment when attempting to close the door. It is the most commonly reported diagnostic code on Chamberlain and LiftMaster openers and is almost always resolved by cleaning and realigning the photo eye sensors.
Are Chamberlain, LiftMaster, and Craftsman garage door sensors the same?
Yes. Chamberlain Group manufactures all three brands: LiftMaster for professional installers, Chamberlain for consumer retail, and Craftsman as a rebranded version sold historically by Sears. The sensors, wiring, error codes, and alignment procedure are functionally identical across all three.
Can I close my garage door without the sensors working?
Yes, temporarily. Press and hold the wall-mounted button continuously until the door is fully closed. This forces the opener into manual override mode and bypasses the sensor check. However, this disables your only safety system, so use it only as a short-term solution until you realign or repair the sensors.
How long do garage door sensors last?
With routine cleaning and alignment, garage door sensors typically last 10 to 15 years. Sensors exposed to direct sunlight, moisture, or temperature extremes may wear out faster.
Why do my sensors keep going out of alignment?
The most common causes are a loose mounting bracket that vibrates out of position over time, repeated bumps from vehicles or stored items, or tension on the sensor wire pulling the sensor slightly. Tighten the brackets, keep the area around the sensors clear, and ensure the wire has enough slack.
My sensor’s green light is on but the door still won’t close. Why?
The green light only indicates that the sending sensor is working — you also need the amber or yellow LED on the receiving sensor to be solid. If the amber light is off, dim, or blinking, the receiver cannot see the beam. Focus your alignment efforts on the sensor with the amber LED.
How much does it cost to replace garage door sensors?
Replacement sensor kits for Chamberlain, LiftMaster, and Craftsman openers cost $30 to $50 at most hardware stores or online retailers. Professional installation typically runs $75 to $150 including parts, depending on the service provider and region.
Is it safe to align garage door sensors myself?
Yes. Sensor alignment is a low-risk DIY task that requires only basic tools and takes about five minutes. The sensors operate on low-voltage current, and you are not working with springs, cables, or moving parts. If you’re comfortable using a screwdriver, you can realign your sensors safely.
About This Guide
This guide was written by the team at Motion Garage Doors, a full-service garage door installation and repair company serving the Greater Toronto Area. We install, service, and troubleshoot Chamberlain, LiftMaster, Craftsman, and every other major opener brand — and sensor alignment is one of the most common issues we resolve for homeowners. If you’ve worked through this guide and your door still isn’t closing correctly, the issue may be with the opener’s logic board, travel limits, spring system, or trolley. For a professional diagnosis and same-day service in the GTA, visit motiongaragedoors.ca or call